Calendar An icon of a desk calendar. Cancel An icon of a circle with a diagonal line across. Caret An icon of a block arrow pointing to the right. Email An icon of a paper envelope. Facebook An icon of the Facebook "f" mark. Google An icon of the Google "G" mark. Linked In An icon of the Linked In "in" mark. Logout An icon representing logout. Profile An icon that resembles human head and shoulders. Telephone An icon of a traditional telephone receiver. Tick An icon of a tick mark. Is Public An icon of a human eye and eyelashes. Is Not Public An icon of a human eye and eyelashes with a diagonal line through it. Pause Icon A two-lined pause icon for stopping interactions. Quote Mark A opening quote mark. Quote Mark A closing quote mark. Arrow An icon of an arrow. Folder An icon of a paper folder. Breaking An icon of an exclamation mark on a circular background. Camera An icon of a digital camera. Caret An icon of a caret arrow. Clock An icon of a clock face. Close An icon of the an X shape. Close Icon An icon used to represent where to interact to collapse or dismiss a component Comment An icon of a speech bubble. Comments An icon of a speech bubble, denoting user comments. Comments An icon of a speech bubble, denoting user comments. Ellipsis An icon of 3 horizontal dots. Envelope An icon of a paper envelope. Facebook An icon of a facebook f logo. Camera An icon of a digital camera. Home An icon of a house. Instagram An icon of the Instagram logo. LinkedIn An icon of the LinkedIn logo. Magnifying Glass An icon of a magnifying glass. Search Icon A magnifying glass icon that is used to represent the function of searching. Menu An icon of 3 horizontal lines. Hamburger Menu Icon An icon used to represent a collapsed menu. Next An icon of an arrow pointing to the right. Notice An explanation mark centred inside a circle. Previous An icon of an arrow pointing to the left. Rating An icon of a star. Tag An icon of a tag. Twitter An icon of the Twitter logo. Video Camera An icon of a video camera shape. Speech Bubble Icon A icon displaying a speech bubble WhatsApp An icon of the WhatsApp logo. Information An icon of an information logo. Plus A mathematical 'plus' symbol. Duration An icon indicating Time. Success Tick An icon of a green tick. Success Tick Timeout An icon of a greyed out success tick. Loading Spinner An icon of a loading spinner. Facebook Messenger An icon of the facebook messenger app logo. Facebook An icon of a facebook f logo. Facebook Messenger An icon of the Twitter app logo. LinkedIn An icon of the LinkedIn logo. WhatsApp Messenger An icon of the Whatsapp messenger app logo. Email An icon of an mail envelope. Copy link A decentered black square over a white square.

King’s fears for prince revealed in old society archives

Prince Albert, later King George VI, with Lady Elizabeth Bowes-Lyon, later Queen Elizabeth

There was a huge amount of upheaval at the outbreak of the First World War in 1914, with few left untouched.

In every household, even in that of the Royal Family, people themselves worrying about their relatives amid the hostilities.

New correspondence, unearthed in the archives of the Aberdeen Medico-Chirurgical Society, has offered an incredible insight into the fears surrounding the health of Prince Albert.

The Prince, later King George VI, was treated for appendicitis in Aberdeen in September, 1914.

Three letters and three telegrams, sent by King George V to Sir James Reid, reveal the monarch’s anxiety about his son and highlight the procedures in place for his care and treatment.

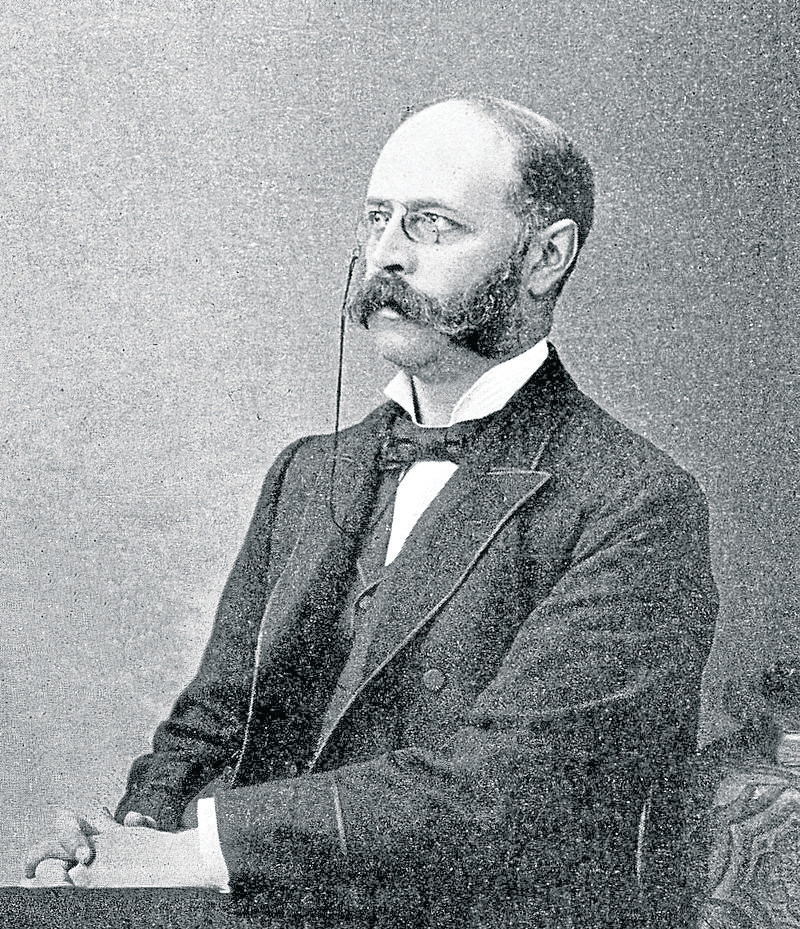
The son of a local doctor, Reid was born in 1849 in Ellon and had an outstanding academic career, prior to graduating from Aberdeen University.

A telegram to Sir James Reid from King George V regarding his son, Prince Albert

While working on the continent, he learned to speak German and as a result, when Queen Victoria was looking for a new Scottish medical attendant who was conversant in the language, he proved the ideal man for the job.

He remained her personal physician until her death in 1901. Sir James subsequently retired, but three weeks after the outbreak of the First World War, received emergency notification from London.

This told him to go to Wick and meet Prince Albert, who had developed appendicitis while serving as a midshipman on board HMS Collingwood.

Sir James sailed on board the hospital ship Rohilla with the prince towards the Granite City.

Travelling via Scapa Flow, they passed battleships and destroyers, all awaiting action.

Since the vessel was too large to enter Aberdeen harbour, Prince Albert was disembarked on August 29 in a cot, by crane into a tug, and brought ashore along with 44 other invalid naval sailors.

He had suffered abdominal symptoms for much of his life, but in this instance, it was deemed necessary to have his appendix removed.

Sir John Marnoch, Professor of Surgery operated on Albert in the Northern Nursing Home in Albyn Place on September 9.

The Aberdeen Medico-Chirurgical Society offered a glimpse of the documents to the Press and Journal.

In a letter to Reid dated three days earlier, the king approved of Sir Alexander Ogston, whom Marnoch had succeeded as Professor of Surgery in 1909, also being present at the operation.

He asked Reid to send a telegram as soon as the operation was over “and telegraph twice a day for the first few days at least”.

Sir James Reid escorted Prince Albert to Aberdeen

The future monarch made a good recovery and both the Prince of Wales and Princess Mary visited Albert in Aberdeen in the following days.

Once he was back on his feet, the prince returned to serve on board HMS Collingwood and took part in the battle of Jutland at the end of May 1916.

However, continuing health problems forced him to leave the navy in July 1917, although he later served as an officer in the fledgling Royal Air Force.

And he made another visit to Aberdeen in 1936 to officially open the new Infirmary building at Foresterhill.